In 2017, we made one of the biggest changes we’ve ever made to our garden: we ripped out our old system and committed to building permanent raised beds. At that point, we were six growing seasons into gardening in the same space. We knew our soil. We knew our climate. And we knew, very clearly, what wasn’t working.
Eventually, we admitted what was obvious: if we wanted to keep gardening long-term, something had to change. Fresh soil. Physical separation from the ground. A system that worked with us instead of against us. That was the moment we decided to invest in raised beds that were meant to last.
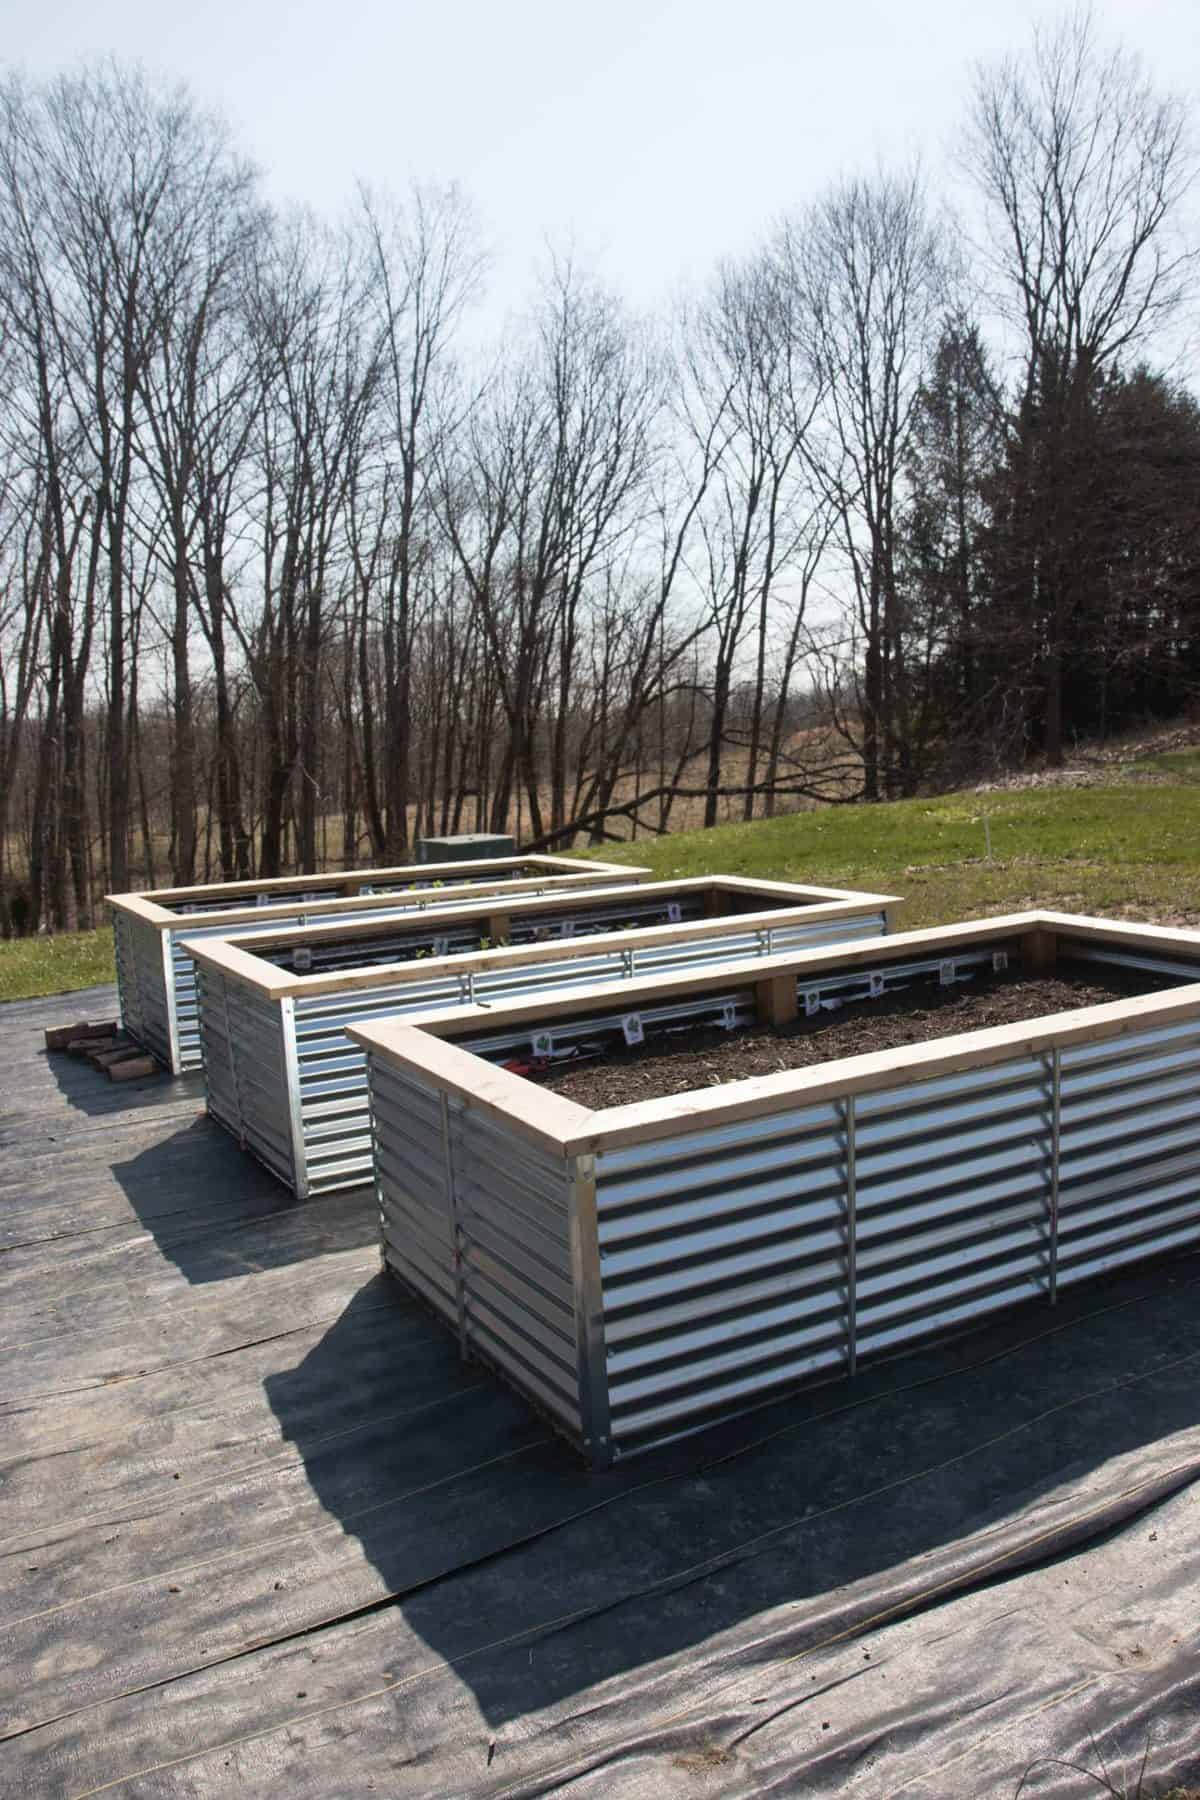
Table of Contents
Why We Chose Raised Beds in the First Place
We’ve grown in raised beds for years at various properties, and the benefits were already clear to us.
Raised beds give you control. Over soil quality. Over drainage. Over fertility. Over weeds and pests. They also make garden work easier on your body, especially when the beds are tall enough to reduce bending and kneeling.
That said, raised beds aren’t a perfect solution. They reduce total growing space, and they require an upfront investment. There’s no getting around that. But for us, the tradeoff was worth it. We weren’t trying to maximize plant count at all costs. We were trying to build a garden we could still enjoy years down the road.
Choosing the Right Materials (and Ruling a Lot of Them Out)
Once we committed to raised beds, the next question was what to build them from. We went down every rabbit hole imaginable and ruled out plenty of options along the way.
Treated lumber was the cheapest option, and it’s what our earlier beds were made from. But, at the time, we weren’t comfortable with the idea of treated wood sitting in direct contact with the soil we planned to grow food in for decades. We’ve loosened a bit on this stance over the years, because we’ve learned that in 2004, the treatment process for most treated lumber changed making it much less toxic.
Cedar was the obvious next choice. It’s beautiful, naturally rot-resistant, and widely used in gardens. Unfortunately, building beds at the height we wanted using all cedar pushed the cost far beyond what we could justify. Also, while cedar is rot-resistant, it’s not rot-proof. Cedar, especially when exposed to the elements or below grade, has a life of about 10 years.
We also explored steel planters and steel-framed beds, inspired by the sleek corten steel beds popping up everywhere online. While gorgeous, they were either far too expensive or required complicated framing systems that brought us right back to treated lumber.
We also checked out the seemingly thousands of cheap-made corrugated panel raised beds found on Amazon, and found them to be too flimsy for what we wanted.
What finally clicked was combining materials.
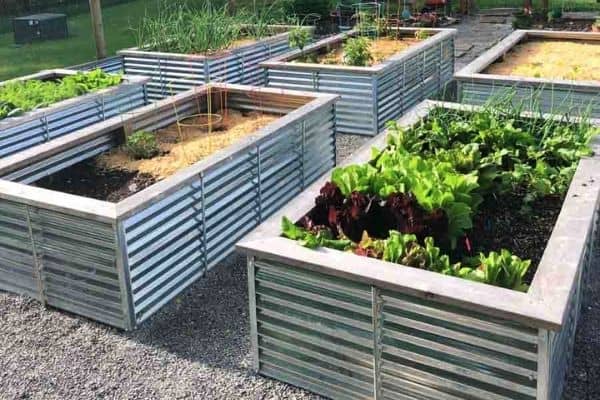
Galvanized steel panels are affordable, durable, readily available, and long-lasting. With the right support system, they don’t bow, they don’t rot, and they don’t need replacing every few years.
After a lot of research and tinkering, Craig designed a system that used galvanized steel panels paired with sealed cedar or treated lumber supports and galvanized conduit for reinforcement. No bulky exterior frame. Clean lines. Strong structure.
That combination became the foundation of the raised beds we still use today nearly a decade later.

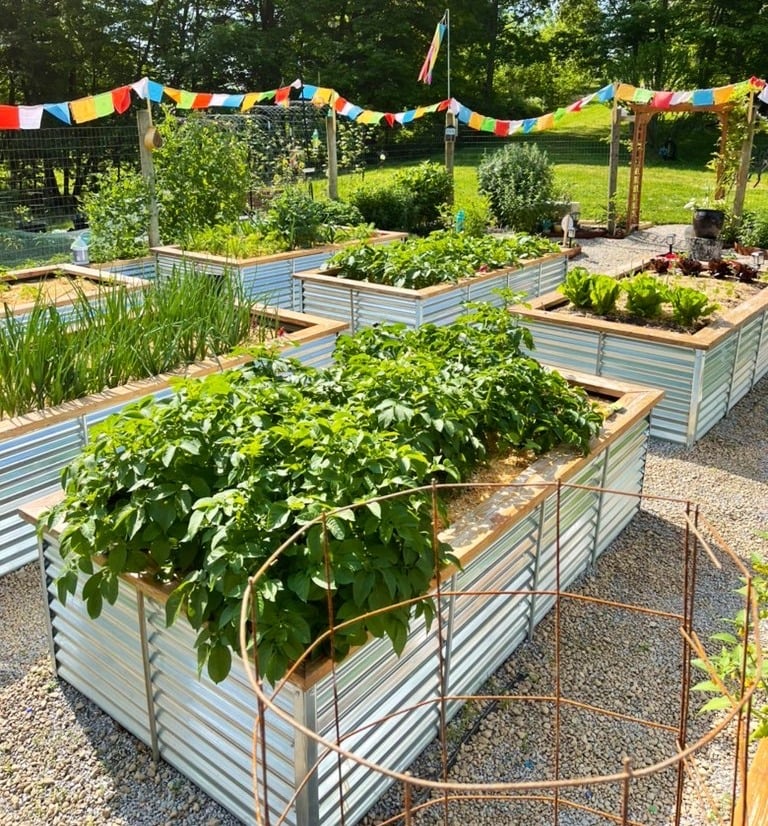
What It’s Been Like Growing in These Beds for Almost a Decade
We built our beds 26 inches tall. That decision was intentional. Yes, they were easier on our backs and knees when we first built them. But more importantly, we were thinking long-term, and I’m glad we thought that far ahead. Because 42 year old me has an entirely different body from the 33 year old me who built these beds.
Beyond that, deep soil has been one of the biggest wins. Root crops thrive. Moisture stays more consistent. Plants are happier than they ever were in our native soil. Are they expensive to fill? Absolutely. But soil is a one-time investment, and we’ve found it’s worth doing right.
Nine growing seasons later, the beds are still structurally solid. The steel panels are holding up beautifully. We have seen some wear in the cedar supports below grade, and now in these plans, we recommend folks either use treated lumber supports or seal their cedar supports with below-grade sealant. These are the exact plans we’ve refined and used over the years.
The 2 Things We’d Change About These Raised Beds
After growing in these for 9 seasons, we honestly love our raised beds, but there are two things we’d change (and both of these items are noted in the plans for these beds).
- If we were building again, we’d seal the buried 4′ x 4′ supports with a below grade sealant or use treated lumber to extend their life even further from 10 years to closer to 15-20. They are 9 years old now, and still holding strong, but we can see where the corner supports will need to be replaced in the next 2-3 years from us originally using untreated cedar below the soil line. We do not recommend using untreated cedar below the soil line.
- We’d make the space between the beds wider. We only did 30″ aisles, and I highly recommend at least 36″ on all sides.

Answering some FAQs about our raised beds
Do galvanized steel beds get too hot in summer?
Surprisingly, no. Because the steel is reflective, it doesn’t absorb heat the way darker materials do. Even during hot Midwestern summers, the soil in our beds often stays cooler than other containers, and we haven’t had issues with root damage or increased watering needs.
How long do these beds last?
The steel panels and conduit should last for decades. Untreated cedar components are expected to last 10 plus years, depending on soil conditions and climate. We do recommend using either treated wood or sealing the 4’x4′ cedar supports with a below-grade sealer to get more than 10 years out of these beds.
Why are the beds so deep?
The extra depth makes gardening easier on your back and knees and gives plants more room to develop strong root systems. Root crops, in particular, thrive with the added soil space.
Will galvanized steel leach into the soil?
Galvanized steel is coated with zinc to prevent rust. In neutral garden soils, zinc leaching is minimal and well below levels considered harmful to plants or people. After multiple seasons of growing food in these beds, we’ve had healthy plants, healthy soil test results, and no signs of issues related to the steel.
Are raised beds worth the cost?
For us, yes. The upfront cost is higher, especially for soil, but it’s a long-term investment. We spend far less time weeding, have better control over our soil, and enjoy gardening more overall.
Can these beds be used with cold frames?
Absolutely. We intentionally left space at the top of the beds so they can be easily cold-framed with simple greenhouse panels laid flat on top with some bricks on the sides to hold it down, which helps extend the growing season with minimal effort. These 3-Season tents also happen to fit perfectly on top of the beds!
Why aren’t the plans free anymore?
When we first built these beds, we shared the original plans for free. Over the past nine years, though, we’ve continued refining the design, building more beds, and learning what works best long-term. The current plans include clearer instructions, additional details, and updates based on years of real-world use. They’re designed to save you time, prevent costly mistakes, and give you a solid, long-lasting garden setup, which is why they’re now offered as a paid resource.
👉 Ready to build raised beds you won’t regret five or ten years from now? the exact plans we’ve refined and used over the years

I love the look of these raised beds. Just finished 6 of them. I need to add some worms to bump up the soil quality. How many night crawlers did you add per bed?
Thank you for posting all of the instructions they were great
Maybe about 100 per bed? They multiply quite quickly!
Beautiful. After 7 years of apartment living, I realized in Covid lockdown I need a yard and garden. I’m moving back into a single family house with a yard.
My question, Why would the bed be too high for some crops? I don’t understand how that matters. Which crops and why should they be in lower beds?
It’s mostly that very tall crops are hard to properly tend to and harvest in tall raised beds. Things like corn and indeterminate tomatoes are easier to take care of, less vulnerable to wind, and easier to harvest from in shorter beds.
Love your beds. You and your husband did a great job with instructions and pictures. Getting ready to replace wood ones to copy yours. I have voles and they just had a field day in my beds last year. Did you connect the hardware cloth to anything on the sides? If so how and with what?
Thank you! We had a few landscape staples through to keep it in place while we filled the beds, but that was it.
About how many bags of soil would it take to fill these up? We don’t have anyone that would deliver quality top soil in our small town.
This soil calculator should be able to help! https://www.gardeners.com/how-to/soil-calculator/7558.html
I thought Stacy’s idea for the plastic caps on top of the conduit was helpful. I was thinking maybe a wooden dowel placed inside the conduit would also give the screw something to grab.
I live in michigan where water isn’t a problem but some people in other climates are having Big problems with drought and using a rubber liner and corrugated drainage pipe about half way up your raised system would stop the need for watering all year but you would need a drain at the bottom for winter draining.
That’s a great idea!
I’m not sure how hazardous pressure treated wood is compared to galvanized steel in this setting but it should be noted that galvanized steel is coated in zinc which is highly toxic and can potentially leach in the right conditions. Juuuust so you know.
Zinc is a necessary nutrient for healthy soil. We have our soil tested every year, and after four years of beds, our zinc levels in our soil are high, but still within the normal range.
I have always had some sort of garden. I had 12 ducks and 3 chickens 4 years ago. 10 of the ducks were our own “ hatchlings.” Surgeries have made gardening very challenging on our 2/3 acre home. Plus, I lost my strong Italian husband to dementia last year. That tiny man could lift anything!!!
My sweet friend and her husband have built these galvanized beds, although they aren’t as tall as yours.
I honestly thought that she was crazy because of the amount of heat I thought it would create. But now, I know better! She IS CRAZY though… they have 26 raised beds, berries, grapes, fruit trees and flowers.
I am 70 and she is 60. I wish I could offer them help, because they are going to need it.
Ok, for me. My garden has lain fallow for two years, with no tilling, but it has had two generous layers of cottonwood leaves put on it by my amazing yard guys.
I have heard that tilling is discouraged now.
What is your opinion? I have also had absolutely no luck with drip irrigation, but here in Utah, we are heading for a drought, so, I’d better speak to the experts.
Yep, the beds don’t get hot at all! And your beds should be in wonderful shape. Either pull back the leaves and plant right in the soil, or you can just mix them into the top layer, and then top them off with compost and plant in that. Happy growing!
I’ve built 4 of these so far. Thank you so much for posting this!
The changes I made were:
1 – cutting the roofing panels in half horizontally is enough parts for two beds – minus the 2×6 cedar boards.
2 – went one size up with the conduit 3/4 inch)
3 – once conduit is in the ground, added these to the tops to give the deck screws something to grab
3/4 Inch Round Plastic Plug / 50… https://www.amazon.com/dp/B07WHZRB27?ref=ppx_pop_mob_ap_share
Lemme know if you want to see pics
Wow, sounds great!
What design did you use for the smaller 13” beds…as far as materials? Did you put wood on top of the panel as well?
We used the same design, just cut in half!
I’d love to see pics!
Hi Michelle, you can see them here on our Instagram! https://www.instagram.com/p/CKM3tDKlVpq/?utm_medium=copy_link
would love to see pictures! my plan is to cut the panels for shorter beds as well!
Hi Stacy! I’d love to see pics of your design and what you did with the conduit! Thanks!
Hey there! I’m wondering what about a higher raised bed makes it bad for the crops you mentioned (inderminate tomatoes, trellis crops). Is it just an issue of accessing the crops to harvest, as those trellised crops grow so high to begin with?
Yep, it just makes it hard to reach everything and keep it stable at that height!
Wonderful and helpful article! I am hoping to build two of your raised beds this spring based on your plans. I am curious about your comment, “We’ve cut the fabric out of the bottom (and folded it up the side of the bed) to allow more interaction with the natural soil.” Why did you make this decision? We have quack grass which is very invasive. I would love to have interaction with the worms in the natural soil but worry about invasive weeds eventually creeping into the raised beds, even through the 2+ feet of soil. Thoughts? Is a potential compromise layering several inches of cardboard in the base of the raised beds to further prevent weed invasion? Thank you so much!
We really wanted to to expose the beds to the native soil to increase worm and microorganism populations. But we also have three beds that are completely lined with landscape fabric, and they grow just fine. Cardboard would work, too!
HI. We just finished building 6 of your raised beds and are really happy with them. Your instructions were spot on! We have however noticed a problem that we hoped you might comment on. The positioning of our beds with the sun makes them positively glow at certain times of the day. The glare from the metal is almost blinding. We thought about spray painting the outside metal, but are worried that it might somehow effect the reflective nature of the metal that keeps the bed dirt cool. Any thoughts?
Yeah, they can be really bright, but we’ve found that it’s only during certain times of year—the angle of the sun eventually shifts enough that it isn’t a problem. I wouldn’t recommend any sort of paint on the metal for the exact reason you list—just wait a few weeks for the sun angle to change instead!
Strangely enough I decided to build a raised box bed today.
It’s my first foray into this kind of thing and I’m really looking forward to finishing it.
Your article is very very enlightening and I’m absolutely glad I randomly went searching for ideas and came across it.
The size of the box I’m building will be 4×3×1 in length, width and height.
I’m using wood from pallets to cut cost and I’ll be putting some hot linseed oil on them to try to preserve the wood as much as possible.
Having never done this before (as mentioned) I hope that the wood is safe enough due to the fact that I don’t know if pallets are treated.
My question though (after that long winded comment above) can you recommend how much soil mix I would need to fill that space.
Also what veggies would you recommend I plant in that space.
Hi Deryck, A soil calculator can help you figure that out! https://www.gardeners.com/how-to/soil-calculator/7558.html
This was great…built 4 4×8 beds, added integrated watering and painted them… I would Love to share some pics but didn’t see how I was able to add any photos? Let me know if you’d like to see how they turned out… Everyone loves them, thanks so much! Looking forward to seeing your cedar beds as I might add the same to our garden next year
We’d love to see them! You can send them to hello@wholefully.com
Could you send me pics of your raised beds Doug? Interested in how you incorporated watering.
I love these plans and the look. Did you consider putting wood in the bottom of your beds and then soil on top? As the wood decomposes it should help the soil maintain moisture.
We didn’t, but lots of people have done this method (also called hugelkultur) with them with great success!
Thank you. Great article and instructions. I’m going to definitely use this for some of my future raised bed bed projects.
I only have one comment regarding the spacing between the beds. I have a friend who will eventually be in a wheel chair. My plans are to make the space wide enough between the beds so her chair will fit smoothly between the beds. I’m fortunate enough to have the luxury of going wider between the beds. I’m thinking at least 4′ – 6′ between the beds would be more than adequate.
Again, thanks for the info.
That’s very considerate of you towards your friend! Enjoy your gardening!
How do you make sure these beds are secure to the ground? Or dose it not matter?
The conduit is pounded into the ground, but it is really the weight of all the dirt that keeps the beds in place!
We built 4 of these this weekend. Thank you so much for the great plans!
That’s great! Good luck with your planting!
Wow, this was EXTREMELY helpful! Thank you for the details, plans and photos!
So glad you found it helpful. Happy gardening!
What a great tutorial on raised reds! I have a few more I need to build soon!
Thank you! Happy building!
Subscribed! 💚
This is genius!
Excellent article! So thorough! I especially appreciate the instructions. I’ve always wanted galvanized beds and thought that I had to buy them. But with your instructions I am going to show my hubby to see if he will brave building two or three for me for the veggies. I love the way they look so lovely! Thank you so much for sharing it!
-Alexandra Yepes
Ig: The_wellness_garden
Hope you get lots of great veggies out of them!
Question for ya. I’m very interested in building these galvanized raised planter beds, like 8 of them. What gage were the roofing panels used?
We used 31 ga.